Skywalking链路追踪--告警篇
1、概述
Skywalking发送告警的基本原理是每隔一段时间轮询skywalking-oap收集到的链路追踪的数据,再根据所配置的告警规则(如服务响应时间、服务响应时间百分比)等,如果达到阈值则发送响应的告警信息。
发送告警信息是以线程池异步的方式调用webhook接口完成的,具体的webhook接口可以由使用者自行定义,从而可以在指定的webhook接口中自行编写各种告警方式,比如钉钉告警、邮件告警等等。告警的信息也可以在RocketBot即ui中查看到。
目前对应我前面文章中部署的8.5.0版本支持的告警接口如下:
- 普通webhook
- gRPCHook
- Slack Chat Hook
- WeChat Hook(微信告警)
- Dingtalk Hook(钉钉告警)
- Feishu Hook(飞书告警)
2、告警规则
2.1 默认告警规则
在Skywalking中,告警规则称为rule,默认安装的Skywalking
oap server组件中包含了告警规则的配置文件,位于安装目录下config文件夹下alarm-settings.yml文件中,在容器中运行的也是一样的
# kubectl -n devops exec -it skywalking-oap-57d7f454f5-w4k4j -- bash
bash-5.0# pwd
/skywalking
bash-5.0# cat config/alarm-settings.yml
以下是默认的告警规则配置文件内容
rules:
  # Rule unique name, must be ended with `_rule`.
  service_resp_time_rule:
    metrics-name: service_resp_time
    op: ">"
    threshold: 1000
    period: 10
    count: 3
    silence-period: 5
    message: Response time of service {name} is more than 1000ms in 3 minutes of last 10 minutes.
  service_sla_rule:
    # Metrics value need to be long, double or int
    metrics-name: service_sla
    op: "<"
    threshold: 8000
    # The length of time to evaluate the metrics
    period: 10
    # How many times after the metrics match the condition, will trigger alarm
    count: 2
    # How many times of checks, the alarm keeps silence after alarm triggered, default as same as period.
    silence-period: 3
    message: Successful rate of service {name} is lower than 80% in 2 minutes of last 10 minutes
  service_resp_time_percentile_rule:
    # Metrics value need to be long, double or int
    metrics-name: service_percentile
    op: ">"
    threshold: 1000,1000,1000,1000,1000
    period: 10
    count: 3
    silence-period: 5
    message: Percentile response time of service {name} alarm in 3 minutes of last 10 minutes, due to more than one condition of p50 > 1000, p75 > 1000, p90 > 1000, p95 > 1000, p99 > 1000
  service_instance_resp_time_rule:
    metrics-name: service_instance_resp_time
    op: ">"
    threshold: 1000
    period: 10
    count: 2
    silence-period: 5
    message: Response time of service instance {name} is more than 1000ms in 2 minutes of last 10 minutes
  database_access_resp_time_rule:
    metrics-name: database_access_resp_time
    threshold: 1000
    op: ">"
    period: 10
    count: 2
    message: Response time of database access {name} is more than 1000ms in 2 minutes of last 10 minutes
  endpoint_relation_resp_time_rule:
    metrics-name: endpoint_relation_resp_time
    threshold: 1000
    op: ">"
    period: 10
    count: 2
    message: Response time of endpoint relation {name} is more than 1000ms in 2 minutes of last 10 minutes
#  Active endpoint related metrics alarm will cost more memory than service and service instance metrics alarm.
#  Because the number of endpoint is much more than service and instance.
#
#  endpoint_avg_rule:
#    metrics-name: endpoint_avg
#    op: ">"
#    threshold: 1000
#    period: 10
#    count: 2
#    silence-period: 5
#    message: Response time of endpoint {name} is more than 1000ms in 2 minutes of last 10 minutes

webhooks:
#  - http://127.0.0.1/notify/
#  - http://127.0.0.1/go-wechat/
2.2 告警规则详解
下面取默认的告警规则中的一条进行分析
rules:
  # Rule unique name, must be ended with `_rule`.
  service_resp_time_rule:
    metrics-name: service_resp_time
    op: ">"
    threshold: 1000
    period: 10
    count: 3
    silence-period: 5
    message: Response time of service {name} is more than 1000ms in 3 minutes of last 10 minutes.
首先提示声明了告警规则名称应该具有唯一性,且必须以 _rule
结尾,这里是service_resp_time_rule(服务响应时间)
- metrics-name:告警指标,指标度量值为
long、double或int类型 - op:度量值和阈值的比较方式,这里是大于
- threshold:阈值,这里是
1000,毫秒为单位 - period:评估度量标准的时间长度,也就是告警检查周期,分钟为单位
- count:累计达到多少次告警值后触发告警
- silence-period:忽略相同告警信息的周期,默认与告警检查周期一致。简单来说,就是在触发告警时开始计时
N,在N+period时间内保持沉默silence不会再次触发告警,这和alertmanager的告警抑制类似 - message:告警消息主体,通过变量在发送消息时进行自动替换
除此之外,还有以下可选(高级)规则配置:
到这里,就能分析出上面列出的所有默认告警规则的含义,依次为:
1 最近3分钟内服务平均响应时间超过1秒
2 最近2分钟内服务成功率低于80%
3 最近3分钟的服务响应时间百分位超过1秒
4 最近2分钟内服务实例的平均响应时间超过1秒
5 最近2分钟内数据库访问的平均响应时间超过1秒
6 最近2分钟内端点平均响应时间超过1秒
7 过去2分钟内端点关系的平均响应时间超过1秒
  这条规则默认没有打开,并且提示:由于端点的数量远远多于服务和实例,活动端点相关度量告警将比服务和服务实例度量告警消耗更多内存
3、自定义告警规则
Skywalking的配置大部分内容是通过应用的application.yml及系统的环境变量设置的,同时也支持下面系统的动态配置来源
- gRPC服务
- Zookeeper
- Etcd
- Consul
- Apollo
- Nacos
- k8s configmap
参考Skywalking动态配置说明,如果开启了动态配置,可以通过键alarm.default.alarm-settings覆盖掉默认配置文件alarm-settings.yml
本文记录的是基于k8s和helm部署的Skywalking,因此可以通过k8s-configmap进行自定义配置的注入,最终在Skywalking配置文件中的实现如下,此文件中有很多变量,通过分析chart,发现已经写好逻辑会根据是否启用动态配置来自动注入所有变量,所以就无需在value.yaml中声明了
cluster:
  selector: ${SW_CLUSTER:standalone}
...
  kubernetes:
    namespace: ${SW_CLUSTER_K8S_NAMESPACE:default}
    labelSelector: ${SW_CLUSTER_K8S_LABEL:app=collector,release=skywalking}
    uidEnvName: ${SW_CLUSTER_K8S_UID:SKYWALKING_COLLECTOR_UID}
...
configuration:
  selector: ${SW_CONFIGURATION:k8s-configmap}
...
  k8s-configmap:
      # Sync period in seconds. Defaults to 60 seconds.
      period: ${SW_CONFIG_CONFIGMAP_PERIOD:60}
      # Which namespace is confiigmap deployed in.
      namespace: ${SW_CLUSTER_K8S_NAMESPACE:default}
      # Labelselector is used to locate specific configmap
labelSelector: ${SW_CLUSTER_K8S_LABEL:app=collector,release=skywalking}在自定义配置告警规则的同时加入webhook后端报警相关配置,configmap文件写法可以参考官方helm
configmap示例
我这里只把默认的报警规则提示信息改成了中文报警信息,具体每条规则的参数没有变化,同时还加入了钉钉webhook配置,具体流程如下
修改chart包的value.yaml,开启动态配置
...
oap:
  name: oap
  dynamicConfigEnabled: true # 开启动态配置功能
...修改chart包中template的oap-configmap.yaml,配置自定义的rule和企业微信webhook
如下 JVM 监控指标暂未实现(更新了策略)
{{- if .Values.oap.dynamicConfigEnabled }}
apiVersion: v1
kind: ConfigMap
metadata:
  name: skywalking-dynamic-config
  labels:
    app: {{ template "skywalking.name" . }}
    release: {{ .Release.Name }}
    component: {{ .Values.oap.name }}
data:
  alarm.default.alarm-settings: |-
    rules:
      # Rule unique name, must be ended with `_rule`.
      service_resp_time_rule:
        metrics-name: service_resp_time
        op: ">"
        threshold: 2000
        period: 10
        count: 3
        silence-period: 5
        message: 服务:{name}\n 指标:响应时间\n 详情:至少3次超过2秒(最近10分钟内)
      service_sla_rule:
        # Metrics value need to be long, double or int
        metrics-name: service_sla
        op: "<"
        threshold: 8000
        # The length of time to evaluate the metrics
        period: 10
        # How many times after the metrics match the condition, will trigger alarm
        count: 3
        # How many times of checks, the alarm keeps silence after alarm triggered, default as same as period.
        silence-period: 3
        message: 服务:{name}\n 指标:成功率\n 详情:至少3次低于80%(最近10分钟内)
      service_resp_time_percentile_rule:
        # Metrics value need to be long, double or int
        metrics-name: service_percentile
        op: ">"
        threshold: 1000,1000,1000,1000,1000
        period: 10
        count: 3
        silence-period: 5
        message: 服务:{name}\n 指标:响应时间\n 详情:至少3次百分位超过1秒(最近10分钟内)
      service_instance_resp_time_rule:
        metrics-name: service_instance_resp_time
        op: ">"
        threshold: 2000
        period: 10
        count: 2
        silence-period: 5
        message: 实例:{name}\n 指标:响应时间\n 详情:至少2次超过2秒(最近10分钟内)
      database_access_resp_time_rule:
        metrics-name: database_access_resp_time
        threshold: 2000
        op: ">"
        period: 10
        count: 2
        # message: Response time of database access {name} is more than 1000ms in 2 minutes of last 10 minutes
        message: 数据库访问:{name}\n 指标:响应时间\n 详情:至少2次超过2秒(最近10分钟内)
      endpoint_relation_resp_time_rule:
        metrics-name: endpoint_relation_resp_time
        threshold: 2000
        op: ">"
        period: 10
        count: 2
        message: 端点关系:{name}\n 指标:响应时间\n 详情:至少2次超过2秒(最近10分钟内)
      instance_jvm_old_gc_count_rule:
        metrics-name: instance_jvm_old_gc_count
        threshold: 1
        op: ">"
        period: 1440
        count: 1
        message: 实例:{name}\n 指标:OldGC次数\n 详情:最近1天内大于1次
      instance_jvm_young_gc_count_rule:
        metrics-name: instance_jvm_young_gc_count
        threshold: 1
        op: ">"
        period: 5
        count: 100
        message: 实例:{name}\n 指标:YoungGC次数\n 详情:最近5分钟内大于100次
      # 需要在config/oal/core.oal添加一行:endpoint_abnormal = from(Endpoint.*).filter(responseCode in [404, 500, 503]).count();
      endpoint_abnormal_rule:
        metrics-name: endpoint_abnormal
        threshold: 1
        op: ">="
        period: 2
        count: 1
        message: 接口:{name}\n 指标:接口异常\n 详情:最近2分钟内至少1次\n
    wechatHooks:
      textTemplate: |-
        {
          "msgtype": "text",
          "text": {
            "content": "SkyWalking 链路追踪告警: \n %s."
          }
        }
      webhooks:
        - https://qyapi.weixin.qq.com/cgi-bin/webhook/send?key=534bb833-a14d-4ea5-975a-032077e57ccc
{{- end }}
如上其中一个百分位的指标如下解释:
service_resp_time_percentile_rule:
    # Metrics value need to be long, double or int
    metrics-name: service_percentile
    op: ">"
    # Multiple value metrics threshold. Thresholds for P50, P75, P90, P95, P99.
    threshold: 1000,1000,1000,1000,1000
    period: 10
    count: 3
    silence-period: 5
message: Percentile response time of service {name} alarm in 3 minutes of last 10 minutes, due to more than one condition of p50 > 1000, p75 > 1000, p90 > 1000, p95 > 1000, p99 > 1000修改完成后,执行helm进行更新
$ cd /usr/local/src/zhdya/skywalking/skywalking-kubernetes/chart/
  kd job skywalking-es-init -ndevops
$ helm upgrade skywalking skywalking -n devops --values ./skywalking/values.yaml
$ helm -n devops list
$ helm -n devops history skywalking
$ kgp -ndevops -owide
验证:XXXXX
结果:
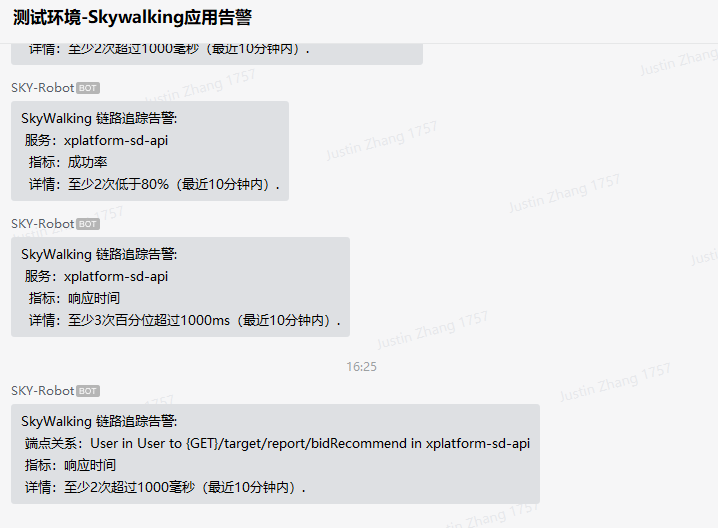
到这里,在Skywalking中配置报警就完成了 ~
附:在一次Skywalking线上分享会上记录的关于使用Skywalking定位问题的思路:
- 纵览全局,
Skywalking拓扑图 - 监控告警,
metric/tracing确定问题存在故障(根据metric做告警,根据tracing统计作比较) - 确定故障在哪,
tracing调用关系,确定故障出现在哪个service或者endpoint profile手段(skywalking新能力)或者常见传统性能定位方法,定位单节点问题所在(比如CPU、内存、io、网络 ——> 动态追踪采样 ——> 火焰图)基本可以解决99.9%的问题
如果要添加自定义告警,首先需要在 oal
文件中添加一个指标,
这里添加一个自定义告警:当接口返回状态码为 404,50, 502, 503, 504 其中一个,就发送告警
root@nx-eks-ctl:/usr/local/src/zhdya/skywalking/skywalking-kubernetes/chart/skywalking/files/conf.d#  下面有个README.md 文件,主要是为了介绍如何去自定义。

Files under `oap/*` will override the counterparts under the Docker image's `/skywalking/config/*`, with the directory structure retained, here are some examples:

| File under `files/config.d/oap` directory | Overrides the file under Docker image's `/skywalking/config/` |
| ---- | -------- |
| `files/config.d/oap/application.yml`                 | `/skywalking/config/application.yml`                  |
| `files/config.d/oap/log4j2.xml`                      | `/skywalking/config/log4j2.xml`                       |
| `files/config.d/oap/alarm-settings.yml`              | `/skywalking/config/alarm-settings.yml`               |
| `files/config.d/oap/endpoint-name-grouping.yml`      | `/skywalking/config/endpoint-name-grouping.yml`       |
| `files/config.d/oap/oal/core.oal`                    | `/skywalking/config/oal/core.oal`                     |
| `files/config.d/oap/oal/browser.oal`                 | `/skywalking/config/oal/browser.oal`                  |
| `files/config.d/oap/oc-rules/oap.yaml`               | `/skywalking/config/oc-rules/oap.yaml`                |
| `...`                                                | `...`                                                 |

例如我需要变更core.oal,复制早先的所有内容,然后追加(需要先新建一个oal的):
// devops 20220704
endpoint_abnormal = from(Endpoint.*).filter(responseCode in [404, 500, 502, 503, 504]).count();本博客所有文章除特别声明外,均采用 CC BY-SA 4.0 协议 ,转载请注明出处!